Methods for Growing Ferns from Spores
Basic considerations
Tree fern spore seems to be viable for perhaps five years, though it is to be expected that germination rates will be lower as time goes by. Spore, which is stored dry in a refrigerator, maintains the best long-term viability.
Spores are a very fine dust. There may be 1000 - 10,000 spores in one tiny packet. You need to take care when opening the packet, and you should only do so at the time of planting. Keep out of any windy area, and don't sneeze whatever you do.
Growing ferns from spores is not a quick process. You will need to be patient, some batches may take a year or more to germinate and some may fail completely. If you want full-size ferns with trunks quickly, then you'll need to go and buy some full-size plants! The business of importation of mature tree fern trunks is likely to cease within the next few years, as too many insect pests are being introduced into Europe.
General method
At a glance:
Sprinkle the spores onto sterilised compost, which needs to be moist. You can, in fact, use almost any reasonable growing medium, including terracotta chips, bricks etc. Cover and leave in a warm (room temperature), well-lit (but not too sunny) place until small heart-shaped leaves develop (prothallium). Once these reach a size of a few millimetres across, mist them twice a week, or whenever they look like they're drying out. The young ferns should then develop, growing out of the prothallium which then die off. If you forget to mist, then in most cases, ferns will still develop, as long as the growing medium is fairly moist.
Method explained in detail:
Use a 50-50 mixture, by dry uncompressed volume, of Irish moss peat (sometimes sieved) and quartz sand. Crushed perlite can be substituted for sand. Perlite has some advantages: it holds water, it reflects light, it might have less contaminants than sand and it usually crushes instead of denting or scratching. After adding rain water (about 50% of total dry volume), 'sterilise' using a microwave oven (4 minutes per cup of mixture in a 800 watt oven) or pressure cooker (25 minutes at 15 psi). The soil must be allowed to cool to a maximum of lukewarm. Rainwater should be boiled and allowed to cool before using to re-hydrate the oven-dried soil. Other media you could try include commercial potting mix, milled sphagnum, vermiculite, crushed terracotta, filter paper, Rockwool, agar, and weak fertiliser solutions. The peat moss with sand mixture is hard to beat.
Sterilisation of containers and utensils:
You can use clear plastic containers with lids, glass, or glazed ceramic pots. Any plastic or glass container covered with plastic wrap would also work well. The obvious advantage of glass and ceramics are that the soil can be sterilised while in the container. All equipment should be disinfected using either heat or chlorine bleach. If it can withstand heat, boil for 5 minutes. If not, soak in 10% bleach solution for 30 minutes and rinse once or twice with previously boiled water.
Set up sowing area:
Ideally, the sowing area should be a sterile laboratory, working under a laminar flow-hood. The next best thing would be to prepare a table for sowing spores by wiping it down with 10% bleach solution. Wear a simple facemask over mouth and nose. Thoroughly wash hands. Place clean smooth white paper onto the air-dried table. And have all pre-sterilised containers and equipment at hand.
Separate spores from chaff by putting the spores on the paper and tapping while tilting the paper; the fine spores stay behind while the coarser chaff bounces forward and is separated. Removing unwanted plant debris from the spores reduces the likelihood of contamination and fungal attacks.
Most ferns, even those from tropical regions seem to germinate fine at room temperature. There is no requirement for a heated propagator. However, this type of propagator (while not plugged in) makes a suitable environmental housing for growing your ferns.
It is said that fern spores need to be sown during lengthening days (springtime) not shortening day lengths, in my experience this makes a huge difference. Some batches sown late in the year do not start to grow until the following Spring, the problem arising from this is that moss and algae are meanwhile taking over the pots.
Ferns typically grow in tropical or sub-tropical rain forest as understorey plants, with their roots in a rich layer of leaf litter and decomposing debris that has fallen from the trees above. This moisture-controlling compost is rich in organic material, and while it may be moisture-retentive, its fibrous nature means that there is also a fair amount of air trapped in the compost, which is essential for good root growth.
Sterilising the compost, tools etc., is vital, but the spores of mould, moss, algae are floating around in the air regardless. Unless you have laboratory facilities, there's little you can do about this. So rapid germination is going to be important. Spore packets that have been on the shelf for a long time may (will) be slow to germinate - so mould, algae etc., will take over long before the spores germinate.
If batches are invaded by mould, you can try a liquid fungicide, reduced to one-quarter strength by dilution. Anything stronger than this tends to kill the prothallium.
The growing medium needs to be damp, but not saturated. If using ceramic dishes, you will need to watch the watering carefully, as it is easy to over-water it. The water used should always be pre-boiled rainwater. You could drill holes in the bottom of the dish for drainage, but it is very hard material to drill. If your propagator is not completely airtight, they will eventually dry out, which is immediately fatal. Prothallium don't have anywhere to store reserves of water to withstand a drought (they have no stems nor proper roots).
You can get good results from sealing the propagator completely round the edges with sticky tape. The propagator then keeps the moisture in for a long time, meaning it needs to be opened less often, and there is no chance of the pots drying out.
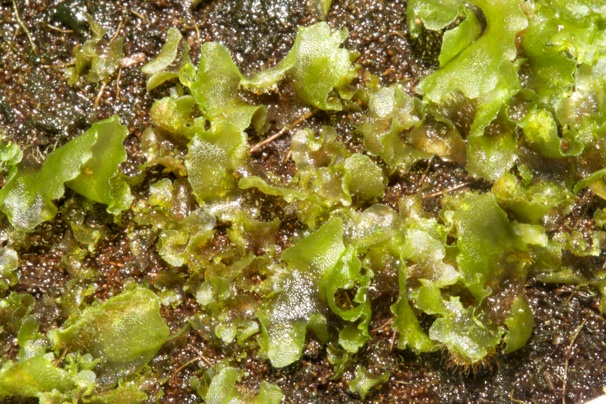
Once the spores have germinated, the prothallium will start to grow. At first these can look like moss, but don't throw them away until they are big enough to be sure. The pot below is doing well, the prothallium are well spaced, which means the young ferns will not be too crowded.
Once true fronds start to appear, wait for the new ferns to reach a height between 3 and 6 cm before potting on. You will find that below this size they are difficult to handle without damage, and the roots are not well developed. For potting on, use the same fibrous compost in small plastic pots. The pots are put into a propagator, watered to the point of being moist but not wet, and the propagator vents and lid sealed with sticky tape.
Hardening off: After the ferns are too tall for the propagator, pot them individually and keep them in plastic bags. After a short settling-in period, cut off the top corners to allow drier air into the bag - small holes at first and then progressively bigger. You do need to move onto the ventilated stage fairly rapidly, because if the fronds are in contact with the wet plastic bag for any length of time, mould can attack. Once the fern sends fronds out of the holes, it's time to cut off the top of the bag completely. At this stage there will still be a humid microclimate inside the bag compared to outside (condensation may appear on the bag from time to time). A few weeks after cutting off the top of the bag, it is time to remove it altogether. You may at this stage get some die-back of the smaller, tender, first fronds, but the newer, bigger ones that were poking out of the top of the bag should be fine.
Special thanks to Francis,
www.growing-exotics.org.uk.